This is why acting quickly after deletion increases the chances of successful recovery. The longer you use the device, the higher the chance the deleted data gets overwritten, making recovery more difficult or even impossible.
Step 1: Check the Recycle Bin or Trash
The simplest and most obvious first step is to check the Recycle Bin on Windows or the Trash on macOS.
Windows: Open the Recycle Bin icon on your desktop. If your deleted picture is there, right-click it and select "Restore." The file will return to its original location.
Mac: Open the Trash folder from the Dock. If the picture is inside, right-click and choose "Put Back," which will restore it to the folder it was deleted from.
Many users overlook this step and jump directly to more complicated methods, but it often solves the problem immediately.

Step 2: Check Cloud Storage Backups
If you use cloud storage services like Google Photos, iCloud, Dropbox, OneDrive, or Amazon Photos, there’s a good chance your deleted image may still be recoverable there.
Google Photos: Deleted pictures stay in the trash for 60 days. Open Google Photos, go to “Trash,” select the photo, and choose “Restore.”
iCloud Photos: Visit iCloud.com, sign in, and go to “Photos.” Look under “Recently Deleted.” You can restore photos within 30 days after deletion.
Dropbox / OneDrive: These services also keep deleted files for a limited time in their recycle bin or deleted files folder. Visit their web interface, find the deleted photo, and restore it.
This step is especially important because it does not require any software installation or technical knowledge, and cloud backups are becoming more common.
Step 3: Look for Device-Specific Backup Solutions
Many modern smartphones and cameras have built-in or companion app backup options that automatically back up your media files.
Android Phones: Google Photos or Samsung Cloud may have backups.
iPhones: iCloud backup, or backups through iTunes/Finder on a computer.
Digital Cameras: Sometimes photos are automatically uploaded or synced to an SD card backup or a cloud service linked with your camera manufacturer.
Explore these backup options to see if your picture is stored somewhere safe.
Step 4: Stop Using the Device Immediately
This step is crucial. If the picture was stored on an SD card, USB drive, hard disk, or smartphone, stop using the device to avoid overwriting the deleted file’s data.
Avoid saving new files, taking new photos, or installing new apps.
If possible, eject the storage media immediately.
Continuing to use the device significantly reduces the chance of recovery.
Step 5: Use File Recovery Software
Drecov Data Recovery
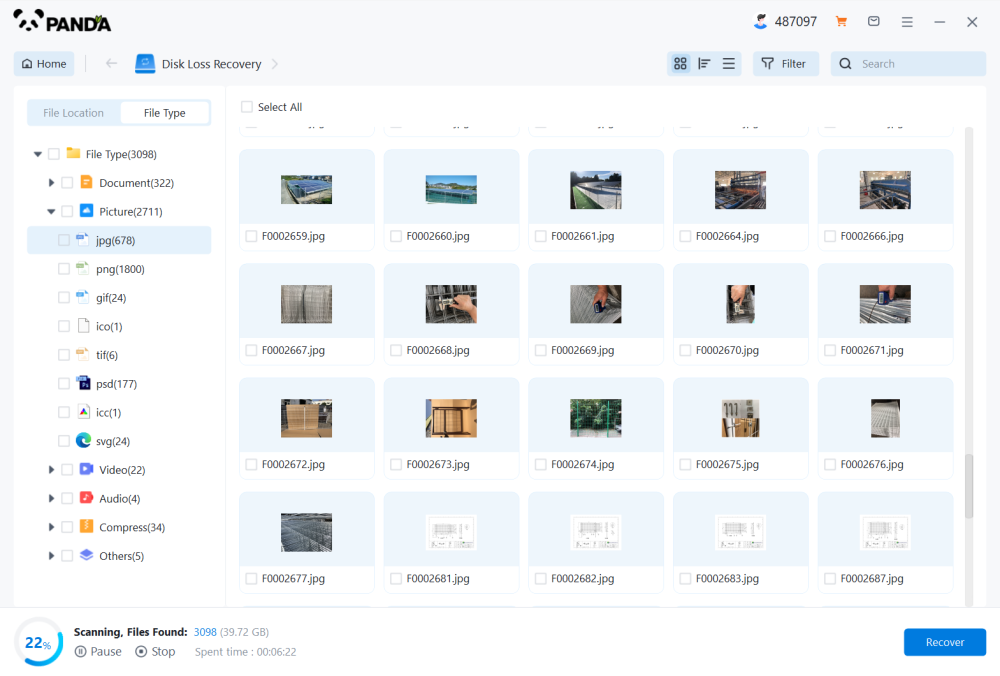
Drecov Data Recovery works by scanning your device’s storage at a deep level to locate deleted files that have not yet been overwritten. It supports recovery from hard drives, USB flash drives, memory cards, and other external storage devices. This flexibility ensures you can recover photos from multiple sources without hassle.
The recovery process involves selecting the device or folder to scan, previewing recoverable pictures, and then restoring them to a safe location. Importantly, Drecov Data Recovery emphasizes saving recovered files to a different drive than the original one to avoid overwriting data and maximize recovery success.
In summary, Drecov Data Recovery is a dependable and easy-to-use software tool for retrieving deleted pictures. Its broad compatibility, intuitive design, and effective scanning algorithms make it an excellent choice for anyone looking to recover lost photos quickly and securely. If you’ve lost important images, Drecov Data Recovery can be a valuable resource to help bring your memories back.
Step 6: Recovering Photos from Memory Cards and Cameras
If you deleted a picture from an SD card or camera internal memory, recovery steps remain similar but have some device-specific notes.
Remove the SD card immediately from the camera.
Use an SD card reader to connect it to a computer.
Use recovery software designed for SD cards (most popular tools mentioned earlier work well).
Avoid formatting the card before recovery; if you have already formatted, don’t panic but expect recovery to be a bit more challenging.
Many cameras also offer a "hidden" recovery feature through their software or apps, so check the camera’s manual or manufacturer’s website.
Step 7: Recovering Photos from Smartphones
Recovering deleted pictures from smartphones can be more complicated due to the way modern operating systems handle storage.
Android Devices
Check Google Photos trash or backups.
Use Android data recovery tools such as Dr.Fone, Tenorshare UltData for Android, or DiskDigger.
For rooted devices, deeper recovery is possible; for non-rooted devices, options might be limited to cached or backed-up photos.
iOS Devices
Check “Recently Deleted” album in Photos app.
Check iCloud backups.
Use iPhone data recovery software such as Dr.Fone, iMobie PhoneRescue, or Tenorshare UltData.
Restoring from an iTunes backup may help if the photo existed during the backup.
Always ensure to backup your device before attempting recovery operations, as they may cause further data loss.
Step 8: Professional Data Recovery Services
If the photo is extremely valuable and none of the above methods work, consider professional data recovery services.
These services specialize in recovering data from physically damaged or corrupted drives.
They use advanced lab techniques like chip-off recovery and magnetic force microscopy.
Costs can be high, so weigh the value of the photo against the expense.
Choose reputable services with good reviews and clear pricing.
Step 9: Preventive Measures and Best Practices
Once you’ve successfully restored your deleted picture or even if you haven’t, implementing preventive measures can save you from future heartaches.
Regular Backups: Use cloud backups (Google Photos, iCloud) or manual backups to external drives.
**Enable “Trash” or “Recycle Bin” features on your device or apps where possible.
**Avoid using the storage device extensively after accidental deletion.
**Use reliable storage devices and replace failing ones early.
**Use photo management apps that offer version history or backup options.
Tips and Common Mistakes to Avoid
Don’t Panic: Immediate action helps but panicking might cause mistakes such as formatting or overwriting.
Avoid Formatting the Device: Formatting the storage medium can reduce recovery chances.
Save Recovered Files to a Different Location: Always save recovered photos to a different disk or partition.
Verify Before Recovery: Use preview features of recovery tools to confirm you are restoring the correct files.
Check Hidden and System Folders: Sometimes photos move to unexpected locations.
Be Patient: Deep scans can take time but improve the recovery outcome.
Common Recovery Scenarios and Solutions
Scenario 1: Deleted Picture from Desktop
Check Recycle Bin.
Restore if found.
If not, use recovery software.
Scenario 2: Deleted Picture from Phone Gallery
Check “Recently Deleted” album.
Check cloud backups.
Use phone recovery apps.
Scenario 3: Formatted SD Card with Pictures
Use recovery software immediately.
Avoid writing any data on the SD card.
Consider professional recovery if software fails.
Understanding File Systems and How They Affect Recovery
Knowing your storage device’s file system helps in selecting the right recovery approach.
FAT32 / exFAT: Common in SD cards and USB drives. Easier to recover files due to simpler structure.
NTFS: Windows default. Supports journaling, which may assist recovery.
HFS+ / APFS: macOS file systems. Use Mac-compatible recovery tools.
EXT4: Linux file system. Use specialized recovery software.
File system corruption may hinder recovery; in such cases, repairing the file system with tools like CHKDSK (Windows) or Disk Utility (Mac) before recovery attempts can help.
When Recovery is Impossible
Sometimes, recovery may be impossible due to:
Overwritten data.
Physical damage to storage.
Encryption without key access.
Data corruption beyond repair.
In these cases, focusing on prevention and future backups is crucial.
Losing a cherished picture can be frustrating, but with the right knowledge and tools, recovery is often achievable. Start by checking simple locations like the Recycle Bin or cloud backups, and if those fail, use trusted recovery software or professional services. Always act quickly and avoid further usage of the device after deletion. Finally, implement preventive measures such as regular backups to protect your precious memories in the future.


